
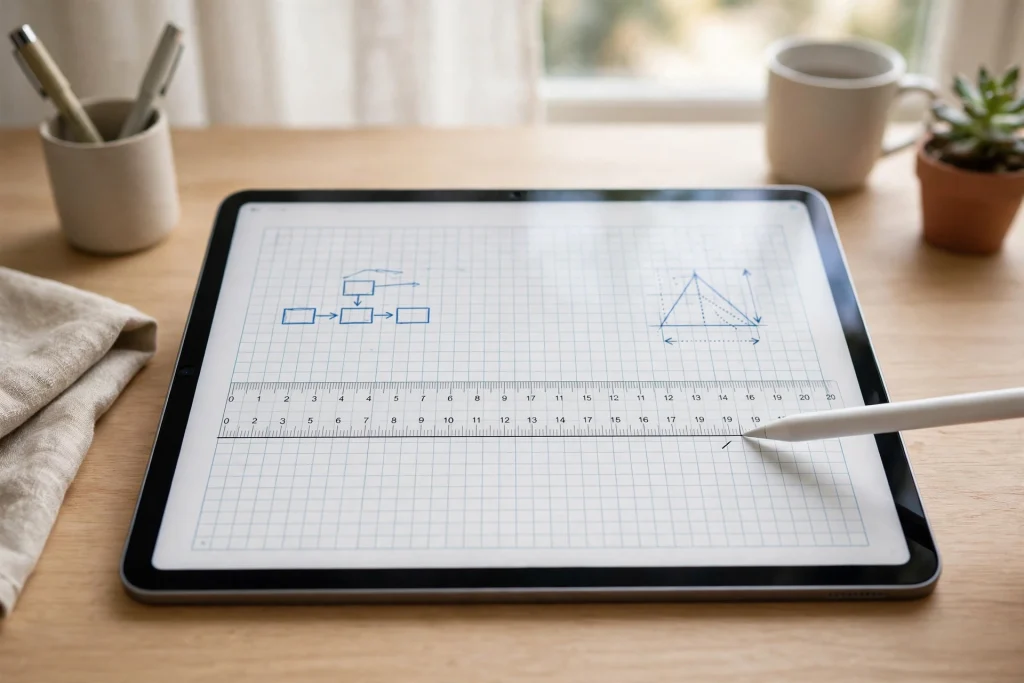
Quick answer: To use the GoodNotes ruler, select the Ruler tool from the Accessories menu (or your toolbar), then draw along either edge with the Pen, Highlighter or Pencil tool — your stroke snaps straight to the ruler. Rotate it with two fingers or use Set Angle for an exact angle, and switch between inches and centimetres in Options.
Wobbly lines ruin an otherwise beautiful page. A diagram that should look precise looks rushed, a planner layout drifts off-grid, and an underline under a heading wobbles like a sketch. Learning how to use the GoodNotes ruler fixes all of that in seconds — and most GoodNotes users never find the tool, because it hides in the Accessories menu instead of the main toolbar.
This guide covers everything: where the ruler lives, how to draw your first straight line, how to set an exact angle, how to switch units, and how to use it for grids, layouts and diagrams. By the end, straight lines will be the easiest thing you draw in GoodNotes.
How to Use the GoodNotes Ruler: What It Does
The ruler is a digital straightedge. When it is visible on the page, any stroke you draw along either edge with the Pen, Highlighter or Pencil tool snaps perfectly straight to the ruler’s edge. The ruler itself cannot draw — it only guides your pen, exactly like a physical ruler guides a real pen.
That distinction matters. If you select the ruler and try to draw with it, nothing happens. The workflow is always two steps: show the ruler, then draw with a writing tool along its edge. Once you know that, the tool makes immediate sense.
The ruler is available on Apple, Android, Windows and Web versions of GoodNotes, and it carries a measurement scale that adjusts to your current zoom level — zoom in for fine work, and the scale follows. You can choose centimetres or inches, set an exact angle, reposition the ruler anywhere on the page, and hide the digits when you want a clean straightedge without numbers.
How to Show the Ruler in GoodNotes
The ruler lives in the Accessories menu, not on the default toolbar — which is why so many people miss it. Here is how to find it:
- Open any notebook page in GoodNotes and make sure you are in handwriting mode.
- Open the Accessories menu in the toolbar and select the Ruler tool.
- Wait a moment — the ruler appears on the current page, usually across the middle, with its measurement scale visible.
- Pick a writing tool. Select the Pen, Highlighter or Pencil tool. The ruler works with all three.
- Draw along either edge. Start your stroke on the ruler’s edge and drag along it. Your line snaps straight, even if your hand wobbles.
If you use the ruler often, do not dig through the menu every time. GoodNotes lets you customise the toolbar, so add the ruler to your main toolbar once and it stays one tap away. That single change is the difference between using the ruler daily and forgetting it exists.
How to Draw a Straight Line With the Ruler
Once the ruler is on the page, drawing a straight line is a three-second job — but a few details make the difference between a clean line and a frustrating one.
First, position the ruler where the line should go. Drag it with one finger to move it, and if you drag past the edge of the page, the ruler reveals more of its scale outside the visible area — useful when a line needs to start off-page. Then rotate it to the angle you want: place two fingers on the ruler and twist, or use Set Angle (covered below) for precision.
Then draw. Place your Apple Pencil or finger on the ruler’s edge and drag along it. The stroke snaps to the edge, so small hand movements do not matter. Use the scale as a guide for the line’s length — if you need a 5 cm line, start at the 0 mark and stop at 5. Lift the pen, and the line stays exactly where you drew it.
Three tips make this smoother. Draw slowly on your first few lines until the snap feels natural. Use the zoom window for short, precise lines — the ruler’s scale adjusts to your zoom, so a line that needs to be exact is easier at 150% than at full page. And remember the ruler has two edges: you can draw along the top or the bottom, which helps when one side is crowded with existing notes.
Set an Exact Angle With the Ruler
Freehand rotation is fine for a quick underline, but diagrams, floor plans and lettering guides need exact angles. GoodNotes gives you two ways to get them.
To set an angle by hand, place two fingers on the ruler and rotate it. An angle indicator appears as you turn, so you can stop at 45°, 90° or whatever the layout needs. For a precise value, select the ruler twice to open its menu and choose Set Angle, then type the exact number of degrees. The ruler snaps to that angle immediately.
The same double-tap menu holds the other ruler controls: Set Position for exact placement, Hide to remove the ruler from the page, and Options, where you can hide the digits or change the measurement unit. Learn this menu once and the ruler becomes a precision instrument, not just a straightedge.
Common angles worth memorising: 0° for horizontal lines and underlines, 90° for vertical dividers and table columns, 45° for diagonals in diagrams, and 30° or 60° for isometric-style sketches. Set the angle, draw the line, hide the ruler — a clean diagram in under a minute.
Switch Units and Hide the Digits
The ruler’s scale defaults to one unit system, and the wrong one is quietly annoying. To change it, select the ruler twice, open Options, and choose Change to Inches or Change to Centimeters. The scale updates immediately, and the setting sticks for your next session.
The same Options menu lets you Hide Digits. With the numbers hidden, the ruler is a clean straightedge — ideal for underlining headings or ruling a journal page where numbers would distract. Show the digits again whenever you need to measure, which is most of the time for layout work.
One habit saves repeated menu-diving: decide your unit once and leave it. If your planner and templates are metric, keep the ruler in centimetres. Switching back and forth is how a 5 cm margin becomes a 5 inch margin.
Draw Grids and Layouts With the Ruler
The ruler’s real power shows up when you build a layout: a weekly spread, a table, a diagram, a floor plan. Here is a practical workflow for a simple grid:
- Set the ruler to 0° and draw your horizontal lines, using the scale to space them evenly — for example, one line every 2 cm.
- Set the ruler to 90° and draw your vertical lines the same way.
- Use the zoom window for the short lines at the edges, where precision matters most.
- Hide the ruler and add your content: headings, text and sketches inside the grid you just built.
For a planner spread, draw the column dividers first, then the row lines, then write the day names across the top. For a table, draw the outer border, then the internal lines — the ruler keeps every line parallel, which is what makes a hand-drawn table look intentional instead of improvised.
Pair the ruler with the Shapes tool when you need filled boxes or perfect circles inside your grid: the shapes tool draws the shape, the ruler keeps your lines aligned to it. Together they cover almost every layout a digital planner needs, which is why they sit next to each other in most people’s workflows. If you plan in GoodNotes every day, the planner basics guide shows how these tools fit into a complete daily system.
Ruler vs Shapes Tool vs Draw-and-Hold
GoodNotes offers three ways to get a straight line, and each suits a different job. Knowing which to reach for saves time and frustration.
| Method | Best for | Limitation |
|---|---|---|
| Ruler tool | Exact angles, measured lines, grids, layouts | Takes a moment to position; needs a writing tool |
| Shapes tool | Perfect lines, rectangles, circles and arrows in one stroke | Less control over exact length; snaps to its own grid |
| Draw-and-hold | Quick underlines and short lines | No measurement, no exact angle, easy to misjudge |
The rule of thumb: draw-and-hold for a fast underline, the shapes tool for a clean diagram element, and the ruler whenever measurement or an exact angle matters. For a full page layout, the ruler wins every time — nothing else keeps a dozen parallel lines evenly spaced.
For brainstorming and sketching, where straight lines matter less than speed, the ruler stays hidden and the digital whiteboard workflow takes over. Use each tool for what it is good at instead of forcing one tool to do everything.
5 Practical Uses for the Ruler
- Planner layouts: rule columns and rows for weekly spreads, habit trackers and budget tables.
- Diagrams and flowcharts: straight connectors between boxes, at exact angles, so the diagram reads clearly.
- Underlining and lettering guides: a 0° ruler under a heading gives you a perfectly straight baseline for hand lettering.
- Floor plans and sketches: measured walls and straight edges for room layouts, before the shapes tool adds doors and windows.
- Tables and checklists: evenly spaced lines that make a hand-drawn table look as clean as a printed one.
Troubleshooting the Ruler
The ruler will not appear
Make sure you selected the Ruler tool in the Accessories menu and that you are on a page in handwriting mode — the ruler does not appear in typing mode or on a locked page. If it still does not show, close and reopen the notebook; a stale session is the most common cause.
My line is not snapping straight
Check that you are drawing with the Pen, Highlighter or Pencil tool — the ruler does not work with the eraser, the lasso or the text tool. Also check that your stroke starts on the ruler’s edge: a stroke that begins off the edge is a freehand stroke, and GoodNotes will not correct it.
The units are wrong
Select the ruler twice, open Options, and choose Change to Inches or Change to Centimeters. If the scale looks wrong after switching, zoom out and back in — the scale redraws at the current zoom level.
The ruler is in the way
Select it twice and choose Hide, or move it to an empty part of the page with one finger. If you hide it mid-layout, reopening it returns it to the same position and angle, so you can hide and show it as you work through a page.
Frequently Asked Questions
Where is the ruler in GoodNotes?
The ruler is in the Accessories menu in the toolbar. If you use it often, customise your toolbar and add the ruler to the main toolbar so it is one tap away instead of buried in a menu.
Can the ruler draw by itself?
No. The ruler is only a guide — it cannot draw on its own. Select the ruler to show it, then draw along either edge with the Pen, Highlighter or Pencil tool, and your stroke snaps straight to the edge.
Does the ruler work on Android, Windows and Web?
Yes. The ruler is available on Apple, Android, Windows and Web versions of GoodNotes, with the same core features: rotate with two fingers, Set Angle, Set Position, unit switching and hiding the digits.
What is the difference between the ruler and the shapes tool?
The ruler guides freehand strokes along a straight edge at an exact angle, which is ideal for measured lines and grids. The shapes tool draws a perfect line, rectangle or circle in one stroke, which is faster for single elements. Use the ruler for layouts and the shapes tool for individual shapes — or combine them.
Ready to rule a perfect page? Open any notebook, show the ruler, and draw five straight lines at 0°, 45° and 90° — that two-minute exercise teaches your hand the snap faster than any guide. Then build one real layout with it: a weekly spread, a table, a diagram. Once the ruler is on your toolbar, it becomes one of those tools you wonder how you planned without. A structured planner helps too: the 2027 Life Planner gives you ready-made pages to practise on, and the GoodNotes planner basics show how the ruler fits into a complete planning system.
Temply Studio
Stop chasing your goals with sticky notes and scattered notebooks. Our premium digital planners and Canva templates are designed to help you plan with intention, stay consistent, and actually enjoy the process.


Questions about this guide?
Ask about the planner, share how you use it, or tell us what to cover next. Your email stays private.