
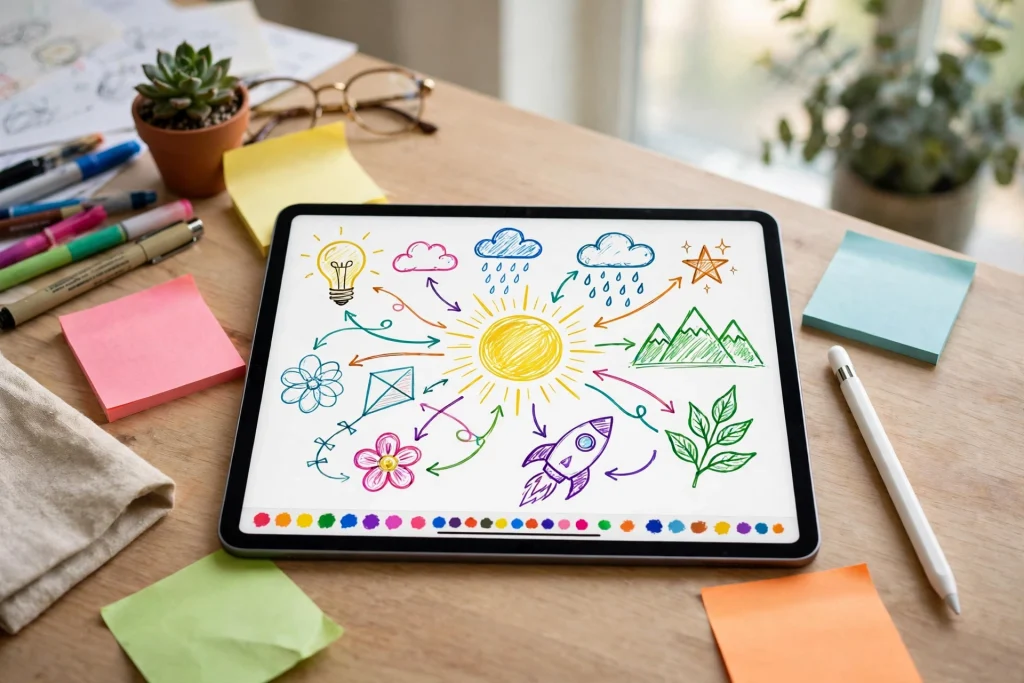
Quick answer: A GoodNotes digital whiteboard is a blank, landscape notebook in GoodNotes used as a free-form thinking space. Set up blank or dot-grid paper, run a fast brain dump, cluster ideas with the lasso tool, and build mind maps with the shapes and pen tools. GoodNotes has no true infinite canvas, but duplicated and linked pages make it work well for solo brainstorming and sketching.
A GoodNotes digital whiteboard turns an app you already use for notes into a thinking space. Most people open GoodNotes to write in a planner or annotate a PDF, but the same tools — a free-form pen, a lasso, shapes, the zoom window and PDF export — also make it a genuinely useful whiteboard. You do not need another app or subscription; you just need to set up your pages differently.
This guide covers setup, brainstorming, mind maps, diagrams and page-size workarounds — and when a dedicated whiteboard app is better.
Why a GoodNotes digital whiteboard Works So Well
A physical whiteboard is wonderful for thinking, but it stays in one room, gets wiped by accident, and cannot be searched later. A digital whiteboard in GoodNotes keeps the freedom of a blank surface while fixing those problems: your boards travel on your iPad, sync through iCloud, and your handwriting becomes searchable text.
It is also part of your daily workflow: if you plan your day or take meeting notes in GoodNotes, your whiteboard pages can live in the same library, next to the notes they belong to. Link a brainstorm to a project page, export a mind map as a PDF, or search your handwriting months later. The limits are real — no real-time collaboration, no true infinite canvas, no draggable sticky notes — but for solo brainstorming and study, it is usually enough.
Set Up a Whiteboard-Style Notebook in GoodNotes
The setup takes about two minutes: more space, less structure, and no lines telling your ideas where to sit.
1. Create a new notebook in landscape orientation
Tap the plus icon, choose Notebook, and pick landscape orientation. A landscape page feels like a whiteboard — wide and open, suited to mind maps that spread sideways. Portrait pages push your thinking into a tall column, the opposite of how most brainstorms grow.
2. Choose blank, dot-grid or light grid paper
- Blank paper — the closest thing to a clean whiteboard. Best for free-form brainstorming and sketching.
- Dot grid — gentle guides without visible lines. Best for mind maps and diagrams.
- Light grid — helpful for tables and timelines.
Avoid lined paper: lines pull your handwriting into rows and make diagrams feel cramped. You can change the paper template later without losing what you have drawn.
3. Pick a small colour palette and add blank pages
Set up three pens: a dark pen for main ideas, a coloured pen for emphasis, and a highlighter for the best ideas. A limited palette — black, one blue and one warm colour — keeps a board readable; ten random colours look exciting for five minutes and unreadable a week later. Add ten or twenty blank pages, and name the notebook after its purpose, such as “Project Brainstorm — Website Redesign”.
How to Brainstorm in GoodNotes
Separate two jobs: generating ideas and organising them. Most people try to do both at once and end up with a neat page and very few ideas. Do the messy part first.
Step 1: Do a fast brain dump
Set a timer for five to ten minutes and write every idea that comes to mind, as fast as you can. Do not judge, sort or cross anything out. Short phrases beat full sentences — “email course”, “guest post”, “free template” — because they are faster to write and easier to move later. Use the zoom window if your handwriting gets cramped: it lets you write small, neat text while the page stays zoomed out. A tidy brain dump usually means you were editing yourself, and editing is the enemy of a good brainstorm.
Step 2: Cluster ideas with the lasso tool
Once the timer ends, switch to the lasso tool — the feature that makes GoodNotes whiteboarding genuinely powerful. Circle a group of related ideas, lift them and drag them together. Repeat until your phrases have formed clusters: content ideas, promotion, tools you will need. Circle loosely, since the lasso selects everything inside the loop, and leave space between clusters.
Step 3: Name each cluster and mark the winners
Write a short heading above each cluster in a different colour and underline it. A cluster called “Launch week” with six ideas underneath it is a plan; six unlabelled phrases are just a list. Then highlight the two or three ideas in each cluster that matter most, and copy them onto a fresh page as an action list — the step that turns a brainstorm into something you will actually do.
For a ready-made structure, a 12-Tab Digital Notebook for GoodNotes gives you tabbed sections per project, so each brainstorm lives in its own tab instead of getting lost in one long notebook.
How to Build a Mind Map in GoodNotes
A mind map is a brainstorm with a centre: one idea in the middle, growing outward in branches. It is ideal for planning a project, revising a topic or untangling a complicated decision.
Step 1: Put the central idea in the middle
Draw a circle in the centre of a blank landscape page and write your central topic inside it — for example, “New product launch”. The centre should be the biggest thing on the page, because everything else radiates from it.
Step 2: Draw the main branches
Draw three to six lines out from the centre, one per sub-topic. Use the shapes tool: draw a rough line, hold your Apple Pencil at the end for a second, and GoodNotes snaps it straight. Write one keyword at the end of each branch — “Pricing”, “Audience”, “Content”, “Timeline” — keeping it to one or two words, because long labels make a mind map hard to scan.
Step 3: Add sub-branches and colour
From each main branch, draw thinner lines for supporting ideas, using a thinner pen or lighter colour so the main branches stay dominant. Two or three levels is usually enough; a fourth level means the idea deserves its own page. Give each main branch its own colour, and use it for its sub-branches too — your eye can follow the blue branch without reading every word. Keep to five or six branches at most.
Step 4: Add small drawings and leave white space
A tiny star, arrow or sketch next to a branch helps you remember it. Resist the urge to fill every corner: white space makes a mind map readable and leaves room to add ideas later. When you finish, zoom out: if you cannot understand the map in about ten seconds, it is too dense — use the lasso to spread branches apart or shorten labels.
Sketch and Diagram with the Shapes Tool
GoodNotes is not a drawing app, but its shapes tool handles the diagrams most whiteboard sessions need: flowcharts, timelines, wireframes, Venn diagrams and process maps. Select the shapes tool, sketch roughly, and hold your Apple Pencil still at the end of the stroke — GoodNotes snaps it into a clean version. It recognises circles, ovals, rectangles, squares, triangles, straight lines and arrows.
- Flowcharts: rectangles for steps, arrows between them, a short verb in each box (“Draft”, “Review”, “Publish”). Keep the flow in one direction.
- Timelines: one long line, short ticks for each milestone, labels above and below in turn.
- Venn diagrams: two or three overlapping circles, labelled in each section.
- Wireframes: rough rectangles for screens, smaller ones for buttons, lines for text — a fast way to plan a page before opening a design tool.
- Tables and grids: outer rectangle first, then the dividing lines. The snap feature keeps them straight.
Draw shapes larger than you think — small shapes are hard to label. And if you need the same shape several times, draw it once, then copy and paste it with the lasso tool.
Colour, Sticky Notes and Visual Organisation
GoodNotes has no draggable sticky-note objects, so fake them: draw a rectangle with the shapes tool, fill it with a light highlighter colour, and write inside it. Because it is just ink, you can move it with the lasso tool, copy it, resize it or delete it like any other handwriting.
Use one colour per category — yellow for ideas, pink for problems, green for decisions — and write the key in a corner of the page. Draw a large, light rectangle around a cluster to show the notes belong together. Use arrows for relationships: a quick arrow says “this causes that” more clearly than any sentence. If a board is also a plan, number the steps. Use pale colours for fills and darker colours for headings: three colours and clear boxes always beat twelve colours and no structure.
Use the Zoom Window for Detail Work
The zoom window is one of GoodNotes’ most useful whiteboarding features. Turn it on and a magnified writing area appears at the bottom of the screen while the rest of the page stays visible above it. You write in the strip, and your writing appears at normal size on the page.
This solves the classic problem: seeing the whole board while writing small, legible text. Without the zoom window you must choose — zoom in to write neatly and lose the overview, or stay zoomed out and write large, clumsy letters. It is especially useful for labelling a mind map, adding small notes to a diagram, and keeping your handwriting consistent. Set the zoom level once and leave it alone: changing it halfway through is why handwriting ends up in two different sizes.
Infinite-Canvas Workarounds: Duplicate Pages and Linked Pages
Here is the honest truth: GoodNotes has no true infinite canvas. Every page has fixed edges, and you cannot pan sideways forever the way you can in a dedicated whiteboard app. For most solo brainstorms this does not matter — a single landscape page holds a surprising amount of thinking — but when an idea outgrows its page, you need a workaround.
Duplicate a page to extend a board
Long-press a page thumbnail, duplicate it, and keep working on the copy — useful when you want to try a different direction without losing the original, or as a safety net before a big rearrangement: duplicate first, rearrange second, and you can always go back.
Link pages together like a canvas
Treat several pages as one long board. GoodNotes supports hyperlinks between pages inside a document, and many digital planners use this technique for navigation. Use the same idea: a mind map on page one, each branch linking to a detail page — content, budget, timeline. The first page stays clean, and the detail is one tap away. If a board is getting crowded, start a fresh page: three clean pages beat one squeezed page where nothing is legible. If you work inside a planner, a Minimalist Undated Digital Life Planner for GoodNotes gives you sections for brainstorm pages alongside your daily plans.
Export and Share Your Whiteboard
A whiteboard is only useful if you can share it or come back to it later. Tap the share icon and choose your format. PDF is best for the whole board in one file anyone can open. Exporting as images is better for a slide deck or chat message, since each page becomes a separate file you can crop or resize.
Export at the highest quality for print or projection: handwriting that looks fine on an iPad can look faint on a projector. Check the page background first — a dot-grid background can look messy in print, so switch to plain white for the exported copy. Use the flattened PDF option when sharing with people who do not use GoodNotes, so your handwriting cannot be accidentally edited. Keep the original GoodNotes page as well as the PDF: the GoodNotes version is editable, the PDF is the snapshot. Thanks to iCloud sync, your boards are also on your iPhone and Mac without exporting.
Solo vs Group Use: Honest Limits
GoodNotes is an excellent solo whiteboard and a poor group whiteboard. It has no real-time multi-user editing: two people cannot draw on the same page at the same time and see each other’s strokes appear live. If your team needs to brainstorm together in real time, you need a different tool.
For light collaboration, one person works on the board, exports a PDF and sends it to the group; the next person imports it, adds ideas, and sends it back. Slow, but it works for small teams. Or share your screen from GoodNotes during a call and brainstorm live while others call out ideas — you draw, they talk — then export the board and send it to everyone. Never pass a single GoodNotes file back and forth through iCloud expecting it to merge two people’s edits: one version will overwrite the other.
When a Dedicated Whiteboard App Is Better
GoodNotes is the right whiteboard for many jobs, but not all. Reach for a dedicated whiteboard app when several people need to draw at once, when you need a genuinely infinite canvas, when you need sticky notes as objects to drag, group and vote on, or when your team is not on Apple devices.
Dedicated apps also come with built-in workshop templates — retrospectives, journey maps, prioritisation grids and voting sessions — with timers and voting built in. GoodNotes has none of that. But these tools are not rivals: do your private thinking in GoodNotes — the messy brain dump, the first mind map, the rough diagram — and move the polished version into a shared whiteboard for the team session. If you are new to planning in GoodNotes, the beginner’s guide covers the basics.
Frequently Asked Questions
Can GoodNotes be used as a whiteboard?
Yes. A blank or dot-grid notebook in landscape orientation works well as a personal whiteboard for brainstorming, mind mapping and sketching. You get a free-form pen, lasso, shapes, the zoom window and PDF export. It lacks a true infinite canvas and real-time collaboration, so it suits solo thinking better.
Does GoodNotes have an infinite canvas?
No. Every GoodNotes page has a fixed size, and there is no way to pan beyond its edges. Work around it by duplicating and linking pages, so a large idea spreads across several connected pages that feel like one long board.
How do I make a mind map in GoodNotes?
Put your central idea in a circle in the middle of a blank landscape page. Draw three to six main branches outward, one per sub-topic, using the shapes tool for neat lines. Add thinner sub-branches, give each branch its own colour, and keep labels to one or two words.
Can I collaborate on a whiteboard in GoodNotes?
Not in real time: GoodNotes has no live multi-user editing. You can collaborate by taking turns and sharing exported PDFs, or by presenting your board on a screen share while others contribute ideas verbally. For live group brainstorming, a dedicated whiteboard app is better.
How do I export a whiteboard from GoodNotes?
Tap the share icon and choose PDF for one or more pages as a single document, or images for each page as a separate picture. PDF is best for sharing and printing; images work better for slides and chat messages. You can also use the lasso tool to copy part of a board and paste it elsewhere. Your notebooks sync through iCloud, so the same board is on your iPhone and Mac without exporting.
If you want a structured home for your whiteboard pages, brainstorms and daily plans in one place, the 12-Tab Digital Notebook for GoodNotes gives you tabbed sections for each project, and the 2027 Life Planner pairs big-picture thinking with a full year of dated planning pages. Set up one landscape notebook, run one real brainstorm this week, and you will quickly see whether the GoodNotes whiteboard fits the way you think.
Temply Studio
Stop chasing your goals with sticky notes and scattered notebooks. Our premium digital planners and Canva templates are designed to help you plan with intention, stay consistent, and actually enjoy the process.
Questions about this guide?
Ask about the planner, share how you use it, or tell us what to cover next. Your email stays private.